Monday, September 24, 2012

Soft and Fluffy Kaiser Rolls

I've been wanting to try my hand at Kaiser rolls for a long time.  I'm not that big of a fan of the grocery store rolls, but I used to live next to a diner that made them fresh every day and they were to DIE for.  Well, I've moved over 1000 miles away from that little diner, so if I want fresh baked Kaiser rolls, I guess it's on me to make them. (0=

I found two recipes that I thought sounded interesting but I didn't really like the entire recipe of either, so I've snipped away at both and combined them to make a truly delightful recipe.  These came out PERFECTLY!  


*The first recipe came from Food.com and the other from Taste of Home, in case your interested in my inspiration for this recipe.

First up, what you'll need:

2 Tbsp active dry yeast

2 1/2 cups warm water (110 to 120 degrees F)
2 Tbsp shortening (you could use oil but it does make a difference)
1 Tbsp sugar
2 tsp salt
6 - 7 cups flour (bread flour is best but All-Purpose is fine)
3 egg whites

Then, for the egg wash before baking:
1 egg white, beaten with a splash of cold milk

topping of your choice (poppy seeds, caraway, etc.)

Directions:

Beat egg whites until very stiff and firm, set aside.

Egg whites - all whipped up


Combine yeast and warm water in the bowl of your stand mixer and let sit for about 5 minutes or until yeast starts to bloom.  
Yeast Bloom

In the mean time, cream together sugar, salt and shortening in a small bowl.  
Shortening, salt and sugar
all creamed together

When yeast is in full bloom, add shortening mixture and 3 cups of flour.  Using your paddle attachment, mix dough for 2 minutes or until it comes together. 


This is what dough should
look like before egg whites
addition.


Remove bowl from mixer and fold in your egg whites.  (I know that we will lose some of the air from the egg whites as we mix and knead in the rest of the flour - believe me, I was skeptical - but this really makes a huge difference in the lightness of your rolls when they're done.)  
Switch to Dough Hook

Return bowl to mixer and switch over to your dough hook.  Gradually add flour, incorporating on LOW speed as you go, in 1/4 cup increments until dough comes together and starts pulling off the sides of the bowl.  

Dough ready to knead by hand.

Pour dough out onto a floured work surface and knead by hand an additional 3 to 5 minutes until dough is smooth and elastic.

You will know it is ready because as you fold and push the dough while kneading, it will begin to spring back more forcefully and will literally fight you to keep it's shape.  Slightly oil the surface of a large (I do mean LARGE) bowl and place the dough in the bowl.  Flip the dough once so that the top side is oiled.  Take a kitchen towel and wet it under HOT tap water, cover the bowl and set it in a warm, draft-free place to rise until doubled (about an hour).

Dough, ready for 1st rise

I live in South Texas where we run the air conditioning 24/7 until mid- to late-October, so there really isn't a warm place in my home.  On the other hand, it is always warm and muggy outside, so I generally place my covered dough on top of my chest freezer in the garage to rise.  It's like MAGIC letting it rise in this humid atmosphere.  Here is what my dough looked like after one hour in my garage.
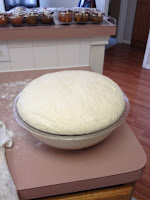

Dough after First rise
After your dough has doubled (as you can see, mine went WAY more than double), punch it down but try not to work it too much.  Flip the dough in the bowl again, re-wet your towel with hot tap water, cover and let rise again for about 40 minutes.


Dough after 2nd rise

After the 2nd rise, you'll want to punch the dough down again and turn it out onto a floured surface.  Roll it out either with your hands or a rolling pin to about a 12 inch square.  Cut the dough into 16 equal pieces.  

Line two baking sheets with parchment paper.  Roll each piece of dough into a ball and place on parchment paper approximately 2" apart for the final rise.  Once all the dough is placed on the pan, re-wet your kitchen towel with hot tap water and cover the rolls again.  Let them rise one last time for about 30 minutes.  


Rolls ready for final rise
Egg wash and toppings
(running out of clean
places for pictures - haha)
In the meantime, heat your oven to 400 degrees F.  Whisk together your last egg white with a splash of milk until it's a little frothy.  

Ready to Bake
Once your rolls have risen for their final rise, uncover and brush the rolls with the egg wash.  Sprinkle toppings of your choice over the rolls.  I've used sesame seeds on one pan, and caraway seeds on the other.  
If you're like me, your regular kitchen oven isn't large enough to accommodate two large baking sheets on the center shelf.  I have situated one shelf in the center of the oven, and the second shelf, on the topmost shelf height. (Please don't look at my dirt in the oven - it's on my list but this is much more fun, don't you think?)

Bake at 400 degrees F, for 15 to 20 minutes or until golden brown.  Mine took the full 20 minutes but I'm at sea level and it's pretty humid in these parts so watch your rolls after 15 minutes.

I started with one pan on the center rack and the other on the top.  At the halfway point of the baking time (10 minutes), I switched the pans so that my rolls would all have a chance to cook evenly.


And FINALLY.......after much ado, I give you>>>


Fresh from the oven, Soft and Fluffy Kaiser rolls!!

Yield = 16 rolls

You could get more or less depending on what size you make them, I would guess you could get up to 2 dozen slider sized rolls from this recipe.


Lastly, I'm not really very tech-savvy, so I don't know how to embed a printable recipe in this post so, if you're interested in a printable format, email me at txtoco2002@yahoo.com and I will send it to you.

Thanks for checking in and happy baking!


Thursday, September 20, 2012

Simply the BEST Chocolate Chip Cookies

I'd been craving chocolate chip cookies for several days.  I don't know about you, but when I'm craving a specific something - nothing else will do.  I tried some Oreos, some chocolate candy, some breakfast cereal bars, and probably a few other things but the chocolate chip cookie monster was still screaming from somewhere deep inside, demanding to be satisfied.  So, I pulled out my trusty recipe and got started.

This recipe is not hard at all, but do plan ahead as they turn out much better if you take the time to chill the dough as directed.  They just seem to flatten out and become hard faster if you skip this step.  It's also a lot easier if you use a stand mixer to mix the dough as it is quite thick at the end of the process.  It can be done manually, but I hope you've been working out because it'll take a strong arm.  LOL.

Here's what you'll need:

2/3 cup shortening
2/3 cup butter, softened
1 cup granulated white sugar
1 cup packed brown sugar (dark will make your cookies moister)
2 eggs (best if room temperature)
2 tsp vanilla extract
3 1/2 cups all-purpose flour, divided
1 tsp baking soda
1 tsp salt
2 cups semi-sweet or milk chocolate morsels
1 cup roughly chopped pecans

Directions:

In the bowl of your stand mixer, cream shortening, butter and sugars until light and fluffy.  You may need to scrape down the sides a couple of times until it's all incorporated.  Beat in the eggs and vanilla.  At this point, you're going to want to change from the whisk attachment to your paddle attachment.

In a separate bowl, combine 3 cups of flour, baking soda, and salt.  Mix into the sugar mixture in batches until well incorporated.   If the dough seems very wet, gradually add in more flour until the dough appears workable. Be careful though, too much flour will result in a crisper cookie.  Finally, add your chocolate morsels and chopped pecans and stir them in on low speed.  (Note: your mixer bowl will be FULL).

Cover the dough with plastic wrap and chill for at least an hour.

When your dough is thoroughly chilled, set your oven to 375 degrees F to preheat.  Lightly grease a baking sheet and drop dough onto sheet by 1/8 cupfuls at least 1 inch apart.  (The original recipe called for 1/4 cup sized cookies but those come out just HUGE.)

As you can see, 1/8 cup is still a substantial sized cookie (0=

Bake for 13 - 15 minutes or until cookies are light golden brown.  Cool 5 minutes on baking sheet before removing to a wire rack to cool completely.

The reasoning behind leaving the cookies on the sheet for a full 5 minutes is that as they start to cool, the cookies will create some steam which will then be absorbed by the bottom "crust" of the cookie helping them to stay moist longer.  I've taken them off too soon and found that by the following day, the cookies were very hard.  So, that being said, I'm a believer in the "leave them on the cookie sheet" school of thought.  


This recipe will yield approximately 2 dozen cookies depending upon how religious you are about measuring your dough out onto the cookie sheet and how tightly you pack it in.

Every time I make these, my husband says that they are the best chocolate chip cookies I've ever made.  I think he just forgets how good they are in between batches.  (0=

I hope you try these and enjoy them.


Wednesday, September 19, 2012

Kaytucky Chicken


So, I know I already posted another recipe today, but I found this one on Food Gawker, which led me to a blog called KayoticKitchen for the recipe.

Here's Kay's recipe (0=

(or you can follow the link above)


It looks fabulous and I wanted to pin it but I couldn't pin it from there so I'm posting it on my blog in a mini-post so I can pin it to Pinterest.

Have a great day everyone!

Copycat Gatorade Recipe

I don't know about your family, but mine is ALWAYS thirsty.  We stopped buying soda sometime last Fall in an effort to 1.) encourage healthier beverage choices, and 2.) reign in our ridiculously high grocery budget.  

After the "soda strike", I found myself buying way too much Gatorade - a healthier option than soda, for sure, but not such a great choice for the budget.  My group could easily go through an 8-pack of Gatorade in one weekend and that stuff is EXPENSIVE!!  I knew there had to be a better way but I had no idea WHAT the better way would be until I stumbled upon this blog post by Jillee one day.  

It's been my experience with "One Good Thing by Jillee", that her advice is always spot-on.  Her blog is so much fun, if you've never stopped by, I'd highly encourage it.  Especially, if you LOVE a good D-I-Y alternative.

But, enough about the why's - I've made this "Gatorade" a few times now for my family and they LOVE it.  The ingredients list is short and sweet which makes it all the better in my book.  (0=

Jillee's recipe only made one quart of the stuff and if I only made one quart at a time, I'd never get out of the kitchen.  I did the math and a few little tweaks and came up with the following recipe which fills 5 - 20 oz. upcycled Gatorade bottles.  I don't even LIKE Gatorade and I give this drink two thumbs up ;)

Without further ado...........(insert drumroll here)

Copycat Gatorade Recipe (makes approx 3 quarts)


You'll need:

1 1/2 cups Orange Juice
3/4 cups granulated white sugar
3/4 tsp kosher salt (or sea salt)
3 Tbsp lemon juice*
Water

*I've found that 1/2 of a medium sized lemon usually yields about 1 Tbsp of juice

1.  Heat 1 cup water to almost boiling and stir in sugar and salt until completely dissolved.

2. Mix in Orange Juice and lemon juice.


3.  Add enough water to make 3 quarts (I added just a splash more than 9 1/4 cups).

4.  Stir, pour into upcycled Gatorade bottles, and refrigerate.


I can't really speak to how long this will stay good in the refrigerator because it goes FAST around here; but I can say that one bottle got "lost" in the fridge, was discovered a couple of weeks later, and it was still yummy!

So, thanks to Jillee, for a great idea and hooray for my grocery budget :D


Thursday, September 13, 2012

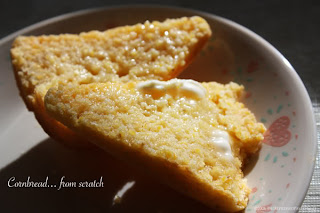
Our Family's Traditional (nothing's better) Cornbread

So, I was browsing around on the internet today and..well, one thing led to another.  You know how it goes, right?  I found a lovely blog post at One Good Thing by Jillee with a fantastic sounding blueberry pancakes recipe and touting a number of reasons why we should ALL own a cast iron skillet.  This got me to thinking about my Mama baking up pan after pan of cornbread for our annual Thanksgiving cornbread dressing and I decided that I really needed to share her recipe (or rather....her mother's recipe) with all the world.  It's just too good to keep it all to myself.

I concur with all of Jillee's reasons why you need a cast iron skillet, and then some; but, this post is about cornbread!!  I love cornbread and it's just NOT the same if it's not baked in a cast iron skillet.  That being said - here is the recipe for my family's delicious cornbread perfection!! (Be forewarned - I never claimed this is the healthiest recipe - lol)


Ingredients:

Yellow Corn Meal           11/3 cup (don't use white - ick!)
Flour                              2/3 cup (all-purpose)
Sugar                             ¼ cup
Salt                                ½ teaspoon
Baking Powder               1 Tbsp
Egg, beaten                    1
Milk                               1 cup (whole milk is best but any milk will do)
Bacon Grease, melty        ¼ cup (can use shortening or 3-4 Tbsp oil but I wouldn't)

Preheat oven to 425°F.  Grease your 10” cast iron skillet.

Mix together dry ingredients in a large mixing bowl.  Add egg, milk and grease.  Beat until smooth using a fork or mixer.  Do not overbeat this - it will be tough and too dense!  Once batter is smooth, pour into greased 10” skillet (you could use a regular baking pan or muffin pan but it just won't be the same, trust me!).   Bake 20 to 25 minutes or until golden brown.

Who could resist such a beautiful mouthful of joy?  Certainly not me.

A lot of ladies commenting on other posts about cast iron cookware had the genius idea to find these treasures at thrift stores and garage sales.  I do not know WHY I never thought of this myself.  I only own ONE cast iron skillet and to buy them new costs an arm and a leg - not to mention that the "pre-seasoned at the factory" pots and pans leave a lot to be desired.  So, if you don't have at least one cast iron cookware item, I would encourage you to go out and find one.  The older and more heavily used they are, the better.  Happy cooking my friends. (0=

Disclaimer:  The images posted here are not mine.  I haven't made this since last Thanksgiving so I currently do not have any of my own pictures.  These photos very closely represent what my finished product looks like.   I've placed links on each photo back to it's source.